
Keeping an axolotl isn’t as easy as it may seem. Just like most fishes, axolotls are aquatic creatures that require precise water conditions and proper care to live a long life. If you are not willing to make frequent water testing and changes, you can stop here. Axolotls are just not for you.
But if you are ready to commit your time to be responsible owners for your axolotls, You will need to know exactly what to do and how to do it.
In this guide, I will bring you through every aspect that many miss when taking care of their axolotl. After reading this guide you will have everything you need to keep a healthy axolotl. Let’s begin.
Axolotl housing
What size tank should I use?
An adult axolotl can grow between 15 cm to 45 cm (6–18 in) so you have to make sure there is more than enough space for them to swim around. A general rule of thumb is 10-gallon water tank but I will recommend a 20 gallon or more for 1 axolotl to have sufficient space. Tank you choose should also come with a lid or cover to avoid axolotl from jumping out.
Here are 2 examples of aquarium tank for 1 axolotl:
- For juvenile axolotls that are approximately about 4 to 5 inches long, you will need at least a 20”L x 10”W x 16”H 10-gallon tank.
- For adult axolotls that are about 7 to 14 inches long, you will need at least a 20 gallon 30″L x 12″W x 12″H water tank.
What if I have 2 axolotls?
For 2 to 3 axolotls you can go for a 60-gallon breeder water tank. This will provide ample hiding space for 2 axolotls and possibly works as well for 3 axolotls. You might want to consider an 80-gallon tank for anything more than 3 axolotls as well.
So the rule of thumb for axolotls housing is every 1 adult should have space of a 20-gallon water tank. This allows you to create “hiding spots” for them to relax and destress.
See more options for 20-gallon fish tank here and 40-gallon fish tank here.
What filter should I use?
Water filters help greatly as it reduces the amount and frequency of water changes you have to do. But using the wrong filter can create unnecessary stress for your axolotls. Axolotls do not like strong water currents. They live in calm water environments so it is important to recreate that habitat for them.
Here’s the worse part…
Strong water currents are one of the main cause for bent or folded gills. It is also a symptom of stress that can lead to many problems later. That said, we definitely do not want a filter that is too weak as well. After all, filtration is to keep your water clean and that is more important than having strong water flow which can be mitigated within a few ways below. To control the water flow and current, it is imperative to know what type of filter to use for your tank setup.
Here are 3 recommended filters and where to get them:
Sponge filter
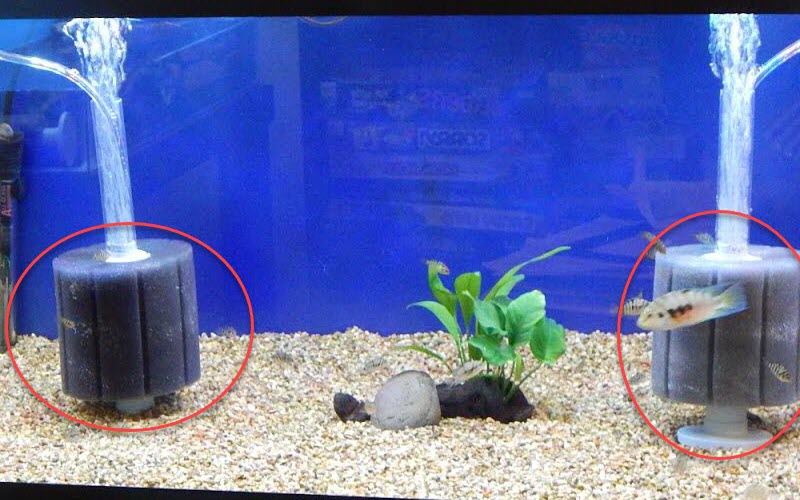
Sponge filters are a really reliable way to filter your tank with little budget. They come really cheap from online stores but they still do a good job of cleaning your tank. For bigger tanks, you can also you 2 or more sponge filters at each corner to remove any potential dead spots.
Advantages
- Less expensive.
- Low maintenance: easy to clean – just squeeze and rinse it.
- Does not cause strong water currents.
- Will not hurt your axolotl gills as it uses a sponge for suction.
- The sponge can be used to cultivate beneficial bacteria.
- No problem keeping up with biological filtration.
Disadvantages
- Requires air pump.
- Poorer mechanical filtration: Not the best at removing debris and dirt.
- Make more noise as you need an air pump.
- Poorer mechanical filtration – have to clear poop yourself.
Setting up a sponge filter
Requirements:
Step by step:
[embedded content]
Video source: Hmoob Thor
- Check to see if the lift tube is too high for your tank. Cut it to the necessary height. Lift tube should be 2 to 3 inches below the water surface.
- Disconnect the head the “bullseye” of the sponge filter
- Optional: At the bottom of the bullseye you can also attach your airstone using another shorter airline/tube.
- Attach the airline/tube through the lift tube into the bullseye of the sponge filter
- Connect the “bullseye” to the sponge filter
- Connect the other end of the airline/tube to the check valve then to the air pump
- Submerge your sponge filter into a corner of your fish tank
- Switch on your air pump
- You should see bubbles coming up from your sponge filter lift tube
You can purchase a full set of both the air pump and sponge filter here.
HOB or hang on back filters
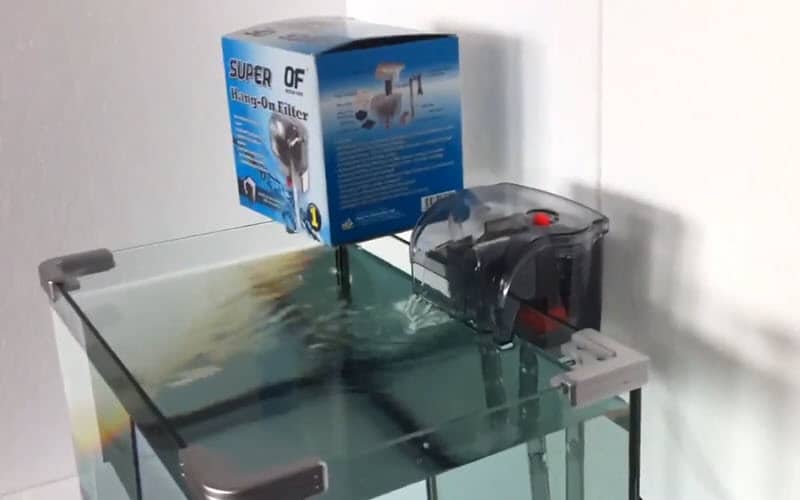
Hang on back filters are perfect for smaller sized tanks and are really convenient to set up. They do cost more than a sponge filter but it is definitely worth it as it does a better job with mechanical filtering.
Advantages
- Provide excellent mechanical filtration – pull more solid dirt and debris out to improve water clarity
- Easy changing of filters.
- No spillage of water even if seal comes loose. Water stays in filter or tank.
- No problem keeping up with biological filtration
- Most HOB perform very well in all 3 filtrations: mechanical, chemical and biological filtration
Disadvantages
- Slightly more expensive
- Can be noisy
- More expensive to maintain: Required to buy and change filter cartridges inside every few weeks.
- Stronger suction that has the potential to hurt your axolotl. Can be mitigated using an intake sponge.
- Strong water outflow on the surface. Can be mitigated using a sponge, loofah or a rock to disperse the flow of current.
Setting up a “Hang on back” HOB filter
Requirements:
- 1 hang on back filter
- Media pack (1 pack should come with hang on back filter) – It consists of:
- Sponge. Takes care the mechanical part of filtration by absorbing dirt and debris
- Carbon packet. Takes care of chemical filtration. It gets rids of impurities
- Biomax balls packet. Takes care of biological filtration. Allows beneficial bacteria to grow.
Step by step:
[embedded content]
Video source: Taylor Nicole Dean
- Rinse your media starting from the sponge
- Open up the HOB filter and remove the media basket.
- Attach your sponge at the most bottom of the media basket
- Rinse your carbon packet. You should hear bubbling sounds from the carbon pack
- Add it on top of your sponge in the media basket
- Open up the bio balls and lay them on the filter media bag (Net)
- Add in on top of your carbon pack in the media basket
- Attach media basket into HOB filter.
- Attach U shaped tubing on the left side of the filter
- Attach filter nozzle onto the U shaped tube.
- Hang the filter at the back of your tank. Use stability piece that can adjust the position of your filter
- Switch on the filter. You may hear it making a loud noise because there is no water within it.
- Use your turkey baster to collect some of your tank water and put it into the filter.
Popular choices for hang on back filters:
#1 Aqua clear HOB filter – Strong water flow from filters can irritate axolotls and give them additional stress. Water flow from Aqua Clear HOB filter is constant and can be kept minimal.
#2 Fluval HOB filter – Fluval is another popular brand of HOB filters for axolotls. Similar to Aqua clear, Fluval water flow can be adjusted and kept minimal to ensure a calm and serene environment for axolotls.
Canister filter
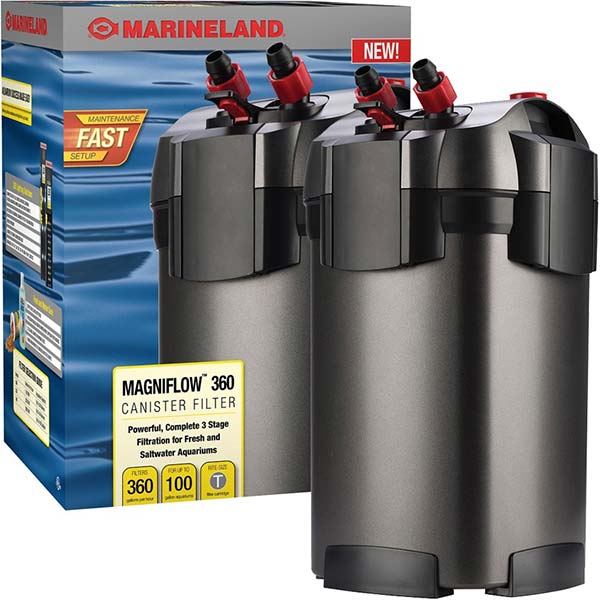
The canister filter is generally used for larger tanks as their setup allows better water flow and water circulation. Canister filters are normally put below the tank with intake and outtake tubes on each end of the tank creating better water flow and filtration.
Unlike most HOB filters where the intake and outtake of water are close to each other, this leaves a lot of dead spots where water may not be properly filtered.
Advantages
- Most brands are relatively quiet
- The filter is placed outside the tank so lesser parts of the filter are visible within the tank
- Excellent water flow for filtration from the sides – Cover more areas. No dead spots
- Larger capacity for biological filtering – Media trays can be changed to facilitate more biofiltration or add in chemical filtration
- Canister filter perform very well in all 3 filtrations: mechanical, chemical and biological filtration
- Can use it with UV light sterilizer
Disadvantages
- Water outflow can be strong. Can be reduced with a spray bar
- If seal comes loose, be prepared for water spillage all over the floor
- Can be expensive
Setting up a canister filter
Step 1: Open up the seal and make sure filter media are in right order. If not in the right order, change it to the following order:
Note that some canister filters have spaces at the bottom. You can fill up space with ceramic rings at the bottom before your adding your mechanical filtration.
At the bottom, the most part should be your sponges for mechanical filtration as water will come in from the bottom. Make sure the coarse sponge is at the bottom level followed by medium than the fine one at the top.
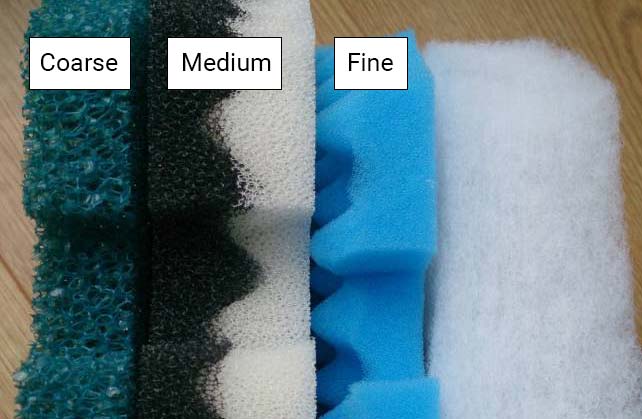
Second level media can be carbon for chemical filtration but this is optional.
The topmost level should always be your biological filtration. This is where you put in your bio balls in media bags.
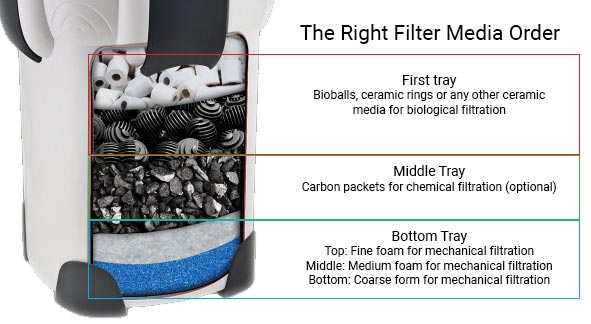
The correct order to set filter media in canister or external filters
Step 2: Slot in the filter media trays. Most canister filter works the same.
Step 3: Depending on the brand, some already have the seal set up, some don’t. If it is not you will have to set it up.
Step 4: Attach the valve on to the cover. Similarly, different brands may work differently.
Step 5: Cut your air tube your preferred length.
Step 6: Connect one end of the air tube to intake hosting and the other to stop valve that says “IN”.
Step 7: Hang it over the sides of your tank.
Step 8: Connect one end of the other air tube to output hosting and the other end to stop valve that says “OUT”. Output hosting can also be linked to a spray bar for better flow for the axolotl.
Step 9: Hang it on the other side of your tank.
Step 10: For the new tank you can prime your new batch of water by using a pump on the canister filter.
Popular external filter choices
Here are a few popular choices of external canister filters that are used my many axolotl owners.
Water conditions
What are the ideal water conditions?
Water conditions are critical to the well being of your axolotl. If they are exposed to increased toxicity, they fall sick easily and may even lead to death. So having proper cycling of your aquarium and water changes are so important.
The question I get a lot is “Can I use tap water”?
Yes. You definitely can. Since Axolotl is freshwater creatures tap water is suitable as long as it is drinkable to you. However, it is not that simple when it comes to the type of water used.
There are many factors on water quality and conditions that are often neglected by many owners. Remember that axolotls are still aquatic animals, they spend most of the time in water. So making sure water is well taken care of will determine their survival.
One of these factors is the chlorine/chloramine levels in the water.
Should you dechlorinate your water?
The answer is: Yes you should. Especially if you are cycling your water. I will most definitely get the water tested for chlorine and chloramine. Then treat it with de-chlorinator to remove traces of chlorine and chloramine altogether.
Dechlorinator like prime also helps remove many other traces of metal that can be found in water as they travel through pipes.
Get prime conditioner for your aquarium from Amazon here. 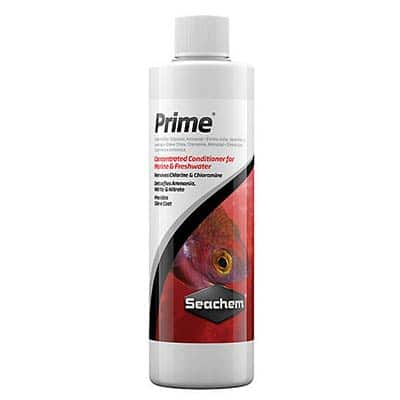
Alternatively, you can also leave the water in the open for 24 hours for the chlorine to dissipate but not chloramine. It could take a lot longer for chloramine to naturally dissipate into the air. So it is still best to just use a dechlorinator.
Apart from chlorine/chloramine levels, you will need ideal water conditions that are not too acidic or alkaline. So the most ideal PH levels are:
- PH levels: 6.5 to 8 (acceptable while cycling your aquarium)
- PH levels: 7.4 to 7.6 (ideal amount for a completely cycled aquarium)
You will also want to make sure at the end of the cycle Ammonia, Nitrate is zero and Nitrite levels are little to none.
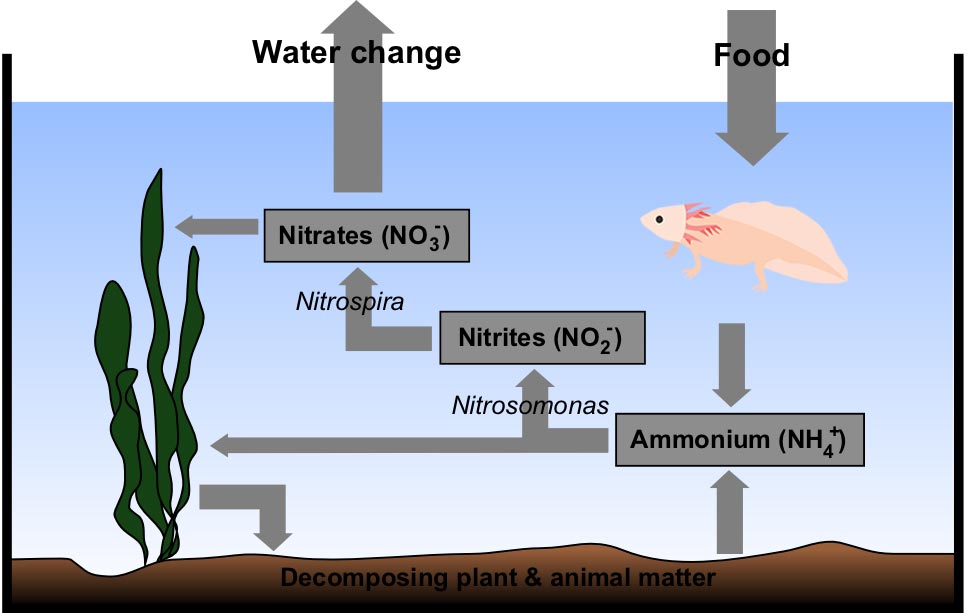
Among these 3 levels, Ammonia is the most toxic. High amounts of it in the water can potentially kill your axolotl. Ammonia is produced from the waste of your axolotls. Higher temperatures and PH levels also increase the toxicity. So always keep your ammonia levels in check.
Similarly, Nitrite or NO2 is produced from ammonia while Nitrate or NO3 is produced from Nitrite. Both on high levels are also toxic to the axolotl.
To make it easy, here are ideal water chemistry levels you need to achieve after cycling
- Acceptable PH levels: 6.5 to around 8.0
- Ideal PH levels: 7.4 to 7.6
- Ammonia Levels: 0ppm (Anything over 1ppm can kill your axolotl)
- Nitrite level: 0ppm (Same as ammonia, 1ppm or more is deadly)
- Nitrate levels: 2ppm to 40ppm (anything higher is toxic. 20% water changes to stop this level rising to toxic levels)
It is very important to change your water every week for a cycled tank. This is to make sure Nitrite build-up is on the manageable scale. We want low levels of nitrate to create healthy bacteria. This process is also known as aquarium cycling.
Learn how to test your water chemistry here.
Water hardness
This is one other thing that most axolotl guides don’t cover. Axolotls prefer slightly harder water which is also good for them as it contains a higher content of dissolved salt.
If water is too soft, it usually means represents higher acidity levels while harder water creates a more alkaline and balance level.
What is hardness important for?
Hard water contains calcium, dissolved salt which is essential for many things – They include heart function, kidney function, nerve function etc.
It is also important for a breeding environment such as the development of eggs, hatching of eggs etc.
If water is too soft, it may result in temporary anemia in your axolotls. The symptoms include pale pigmentation in their skin or even discoloration in their gills. This is not life-threatening but it is a signal to change your water.
Now, here’s the catch.
Most tap water that is drinkable are often slightly harder. Most cities should provide harder water but it is still better to check with your local authorities or test them on your own.
We don’t want water that is too soft or it will result in unhealthy axolotl in the long term due to the lack of calcium and salt minerals.
If you are really serious about giving your pet axolotl the perfect water to live in, you can make your water harder but by adding certain minerals.
Before anything though.
You must test your water hardness first. If tap water you use is already hard, making even harder will not be beneficial for your axolotls but harm them instead.
Steps to test water hardness:
My personal favorite GH (general hardness) and KH (carbonate hardness) test kit is liquid test kit – namely the API GH & KH test kit from Amazon. They are the most accurate compared to test strips. Preparation:
- Prepare 2 flat-based vials
- GH test kit solution is teal colored labeled bottle
- KH test kit solution is light blue (turquoise) labeled bottle
So let’s begin with GH test:
The objective for GH test is to record the number of drops before the color of your water in the vial turn from orange to green.
Step 1: Fill your vials with your tap or tank water (depending on what you are testing on) to the 5ml marking with a turkey baster.
Step 2: Add 1 drop of GH solution into the vial. Cap the vial and shake it.
Step 3: After shaking, water should turn orange in color. Record down or remember the number of drops.
Step 4: Open the vial, add another drop of GH solution and shake it again. Step 5: Check the color of the vial over a white background to better see the color. Then record down or remember the number of drops you added so far. In this case, it is your 2nd drop.
Step 6: Rinse and repeat until your water turn green and check to see how many drops before your watercolor turned from orange to green. If it is on your 2nd drop where the water turn green, your water general hardness, GH, is 2.
Moving on to the KH test:
The objective for KH test is similar. You have to record the number of drops before the color of the water in your vial turn from blue to yellow.
Step 1: Fill your vials with your tap or tank water (depending on what you are testing on) to the 5ml marking with a turkey baster.
Step 2: Add one drop of KH solution into the vial and shake it.
Step 3: After shaking, put it in front of white background to see if it turns color. Color should turn blue. Record or remember the number of drops you added so far.
Step 4: Take the same step, add another drop, cap it and shake vial.
Step 5: See if color turns from blue to yellow.
Step 6: Rinse and repeat until your color of vial turns yellow. Your Carbonate hardness or KH is the total number of drops added into vial before it’s color to turn from blue to yellow. So if it took 3 drops, your KH is 3.
Water temperature
The ideal temperature for axolotl is between about 16 °C and 18 °C (60-64 °F). Anything more kills them, anything less slows them down. To test temperatures, I find that the 2 following aquarium thermometers are still the best for taking water temperatures.
Digital thermometer
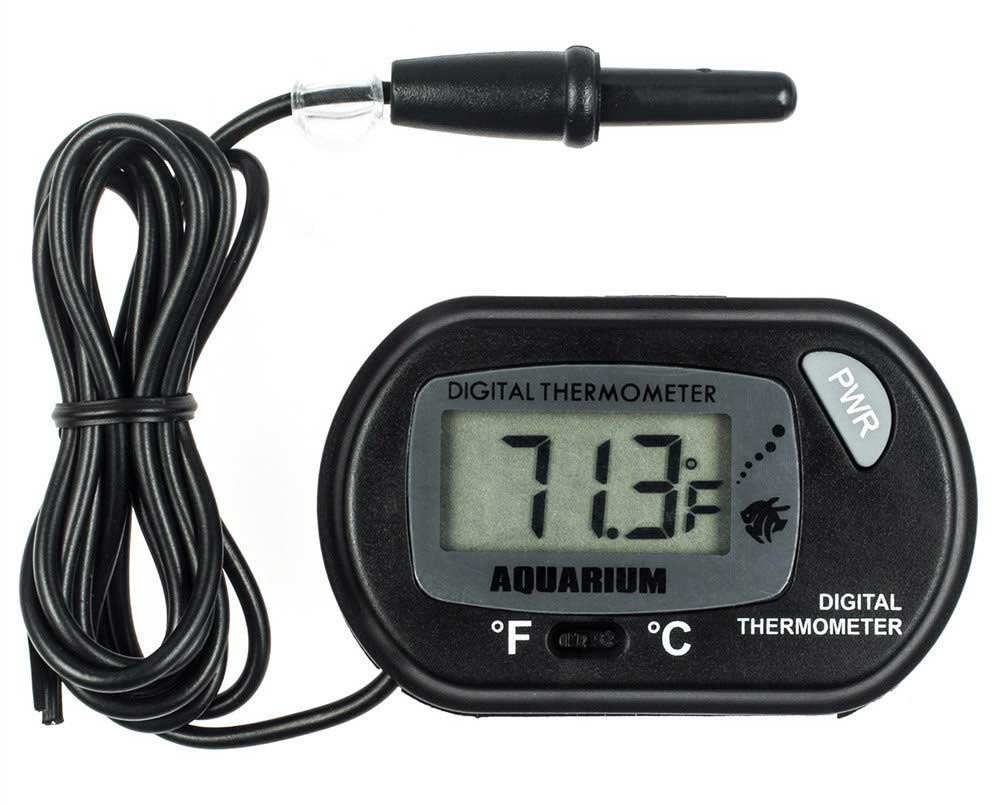
I find that digital thermometer is the most accurate. But it is up for debate as I have a few pals who beg to differ. But one thing is for sure is that digital thermometer is easy to read and extremely convenient to set up.
To set it up. Simply attach the suction cup behind the digital thermometer on the front of your tank that is comfortable for you. Then submerge the probe, “slightly pointy end” or the “sensor” into your tank.
You can set the probe towards the back of the tank and block it with your rock or decor to maintain your aquarium design.
Get your digital thermometer here at Amazon.
Floating thermometer
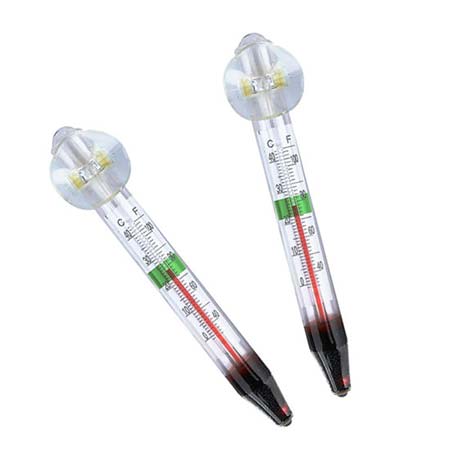
The classic thermometer where you fully submerge into your fish tank. They are really cheap but accurate. To set it up simply attach it into the water at the front of your tank to check out it’s reading.
Check out floating thermometer price here at Amazon.
Thermometer accuracy
Most thermometers are very precise in their readings but sometimes they might not be as accurate. Here is what I mean: To see how far off their readings can be, use the ice cup method to tune your thermometer accuracy:
Ice cup tuning method:
Step 1: Fill a cup with ice cubes and water.
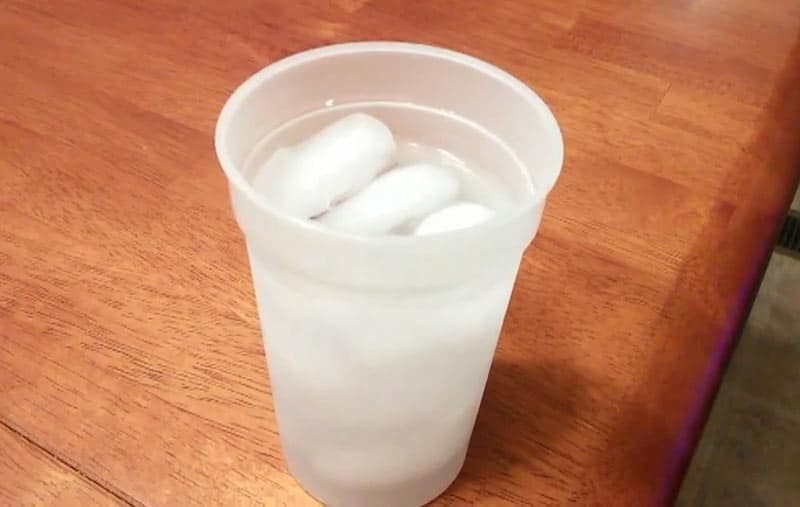
Step 2: Stir the ice for about a minute.
Step 3: Insert probe or thermometer end into the water. Avoid touching ice or cup.

Step 4: Hold it there for about a minute
Step 5: Check the readings. It should be 0C or 32F.
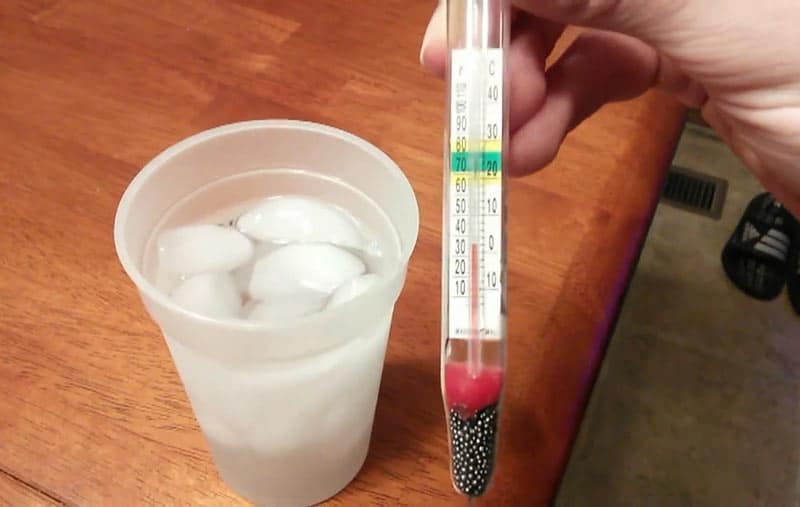
Step 6: if reading is higher like 35F, then the correlation factor is off by 3F. So when you take the temperature of your actual tank, always minus 3F away from your reading.
Keeping your temperature in check
Methods to maintain the temperature in the summer:
During the summer, the surrounding temperature generally cause the overall tank temperature to rise. This is definitely a killer for axolotls. Know that heat rises from the bottom of your tank up to the surface of your tank through evaporation. So what we want is to be able to disperse this heat or deliberately lowering the temperature through various means. Let’s look at them one by one from the cheapest methods to the most expensive ones:
#1 Ice bottle method
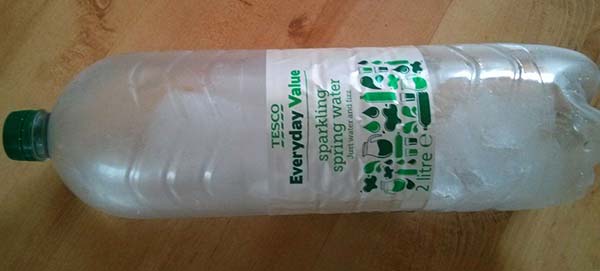
This method is totally free. Just fill up your unused plastic water bottles, chuck them into the freezer and voilà – a frozen bottle that can effectively take your temperature down by 1 to 2 degrees.
How to do it –
Step 1: Fill your bottle with tap water. Do dechlorinate the water in the bottle in case of leaking.
Step 2: Put it in the freezer. Pro tip: don’t fill your water to the brim or your bottle will go out of shape as water expands when it freezes. This expansion might break your bottle causing leakage when it melts.
Step 3: Take it out of the freezer and let it float on the water surface. Pro tip: Tie to close to your Hang on back filter or canister filter outtake if you are using those. This helps the cold water to circulate throughout the tank faster.
Step 4: Take another standby bottle, rinse and repeat the steps above.
Disadvantages of using this method:
- It can get really troublesome as you need to always switch bottles. A 2L bottle approximately lasts for only about 3 to 4 hours on a hotter day. You need to always keep changing your bottles in and out of the freezer at least during the daytime.
- Bottle leaks as it is overfilled before freeze also does happen. Leaking tap water into your cycled tank may change your chemistry levels. So be careful. Use chlorinated water for freezing instead.
- Lastly, the temperature will fluctuate causing inconsistency with the ice bottle method. This could stress out your axolotl.
Some will use ice cubes instead of ice bottle. This may work but they melt really fast so you will need a lot of ice cubes to keep on replacing them. Putting too much ice cubes are also not advisable as a sudden change in temperature will shock your axolotl.
#2 Changing your lid

Change your lid to a screen lid like the example above.
It can cost between 20 to 30 dollars. See screen lid options here.
Screen lids facilitate evaporation to lower temperatures. It can potentially reduce your tank’s temperature by at least 2 to 3 degrees. This method is excellent when paired with an aquarium fan which you will see in the next section.
#3 Using a fan method
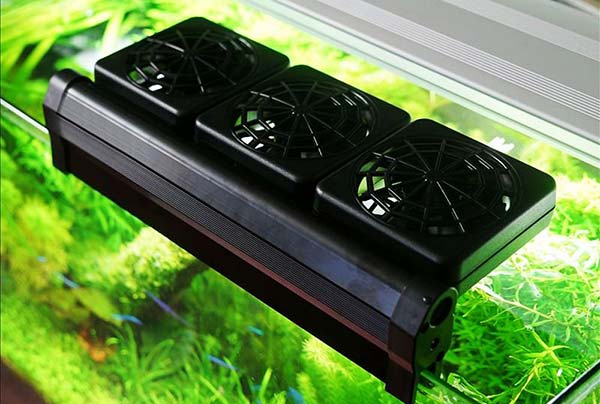
Any fan will do the job. Even your own standing fan you have in your room. Or buying an aquarium fan that cost between 20 to 30 dollars will do the trick. Find and compare the aquarium fans from Amazon here.
The way to do it –
Attach your aquarium fan to your lid and face it towards the surface of the water or if you are using any of your own standing fans, computer fan just make sure to face it towards the surface of your water.
The reason why we do that is because hot air in the tank rises and cold air sinks so by facing your fan to the surface, it helps to disperse heat and facilitate quicker evaporation hence resulting in a lowering the temperature by 1 to 2 degrees.
Note that whether this method works also takes into consideration your room temperature. If it is really very hot, turning on the fan probably will not be as effective. To ensure it works you will have to make sure overall temperature is not too hot.
This brings us to the next method –
#4 Reduce the overall room temperature method
Nothing is going to work if your tank is sitting near the window with the sunlight coming in. Try moving your tank to an enclosed area with lesser exposure to sunlight. One room, for example, it could be your basement.
The alternative way is to install air conditioning or get a portable aircon. It could cost quite a bit but if this makes both you and your axolotl happy, I will say it’s a pretty good long-term investment.
#5 Using a chiller
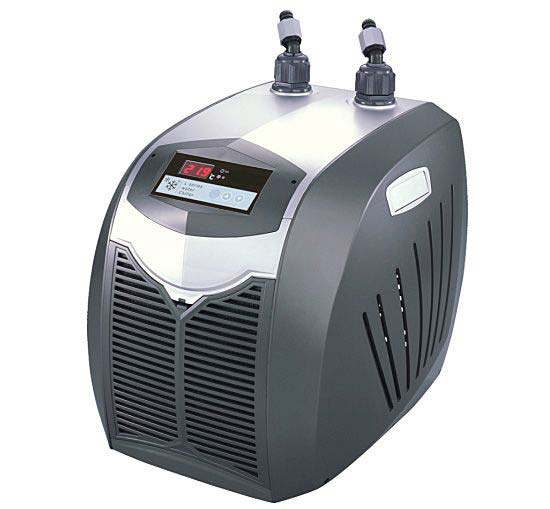
This is still by far the most consistent method. Totally worth it if you if are planning for long term. Here are some chillers that are worth your time.
Setting up a chiller:
Step 1: Layout all the parts that come with your chiller
Step 2: Attach the half-inch tubing to the powerhead or pump and secure it with a hose clamp to prevent leaking.
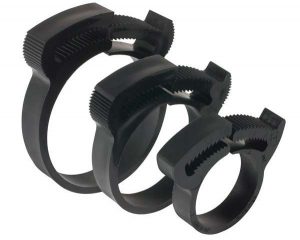
Step 3: Attach U tube from the installation kit to the other end of the half inch tubing and secure it with another hose clamp.
Step 4: Place the power hear or filter pump into the back of your tank.
Step 5: Connect the longer tubing to the U tube.
Step 6: Connect the other end of the longer tubing to the intake outlet.
Step 7: Rinse and repeat for the other side.
Step 8: Switch on your chiller and adjust to the correct temperature you want.
Step 9: Lastly, take the measurement of your thermometer to make sure it is the right temperature.
You can also check out a variety of aquarium chillers for different tank sizes here.
Methods to maintain the temperature during winter:
Axolotls are much easier to care for in the winter compared to the summer. After all, they strive in water temperatures of 16 °C to 18 °C which is more on the cooler side. As temperature fall, they will still do fine but their metabolism may slow down causing them to eat lesser or move lesser.
You should only worry if temperatures are going below negative but that will also mean you will be freezing as well since your aquarium is in your home. As long as your tank does not freeze, they will be fine. If your room has a heater, just turn it up back to the usual warmer temperature, your axolotls will do just fine.
But for whatever reason, your house is getting really cold all the time. You will need a heater in your tank to stabilize the temperature.
Here is how to set up a heater:
Step 1: Submerge the heater into the tank. Good to place it right at the bottom or near the filter outlet. Make sure the tank meets the heater minimum water level requirement.
Step 2: For new tank: before switching it on let it stay submerged in the tank for a couple of hours for it to tune to the current cold water temperature. This is to regulate the thermostat so that it doesn’t heat up too quickly.
Step 3: Set the required temperature of your heater. Let say 18°C.
Step 4: Once the water temperature drops below that, it will turn on. The orange light will be an indication that your heater has started.
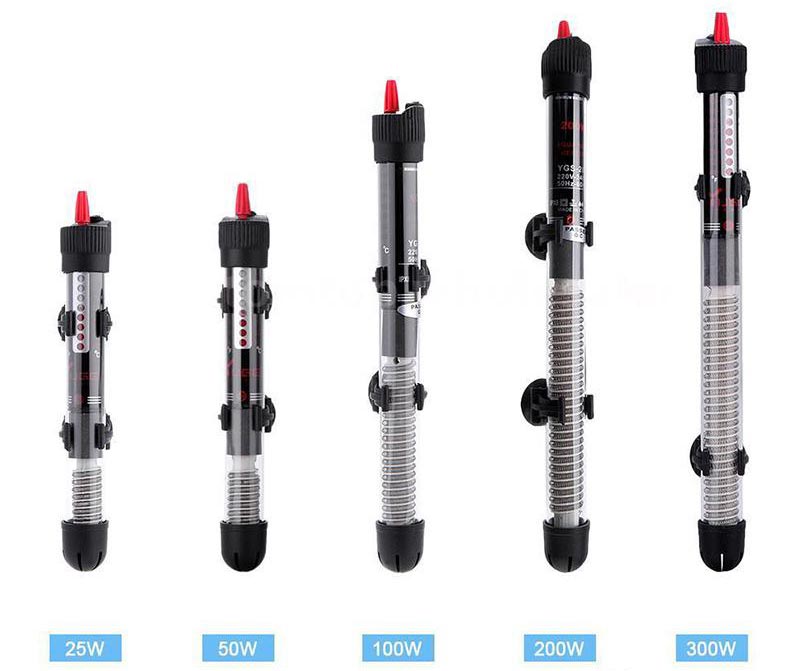
How to choose the right heater:
The general rule of thumb: 4w per gallon or 1w per liter. For example, a 10-gallon tank, you can use a heater that is 50w.
Remember when using heaters in your axolotl tanks. Always check the temperature. Accidentally turning up your heater when there is no need too will definitely kill your axolotl. Get your aquarium heater here.
That is all for temperature. But what comes next is also critically as important.
So keep reading…
Aquascaping
The ideal temperature for axolotl is between about 16 °C and 18 °C (60-64 °F). Anything more kills them, anything less slows them down.
To test temperatures, I find that the 2 following aquarium thermometers are still the best for taking water temperatures.
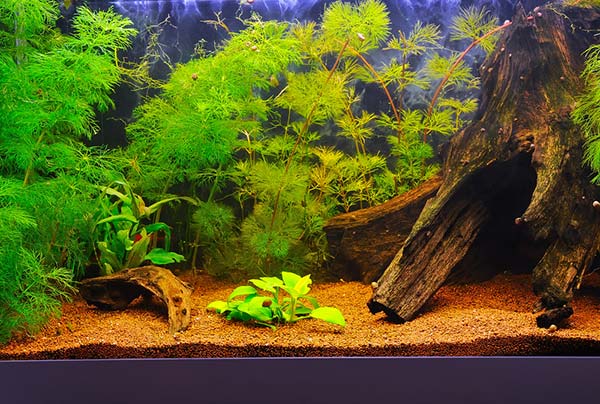
Plants
Plants provide many helpful advantages to your aquarium: Some of these includes oxygen and hiding areas for your axolotls, imitate natural habitat and provide aesthetic pleasure to you.
The best benefit though is that it helps keep your water chemistry more balanced and removes ammonia. Plants are the best biological filtration for your tank so they are something that I highly recommend to have in your aquarium.
But know that not all plants are suitable for axolotls. Axies doesn’t like bright lights while plants require light to photosynthesize and grow. So we will need to make sure we use hardy plants that don’t require much light to grow.
Here is a list of suitable plants that best fit an axolotl housing:
Java Moss
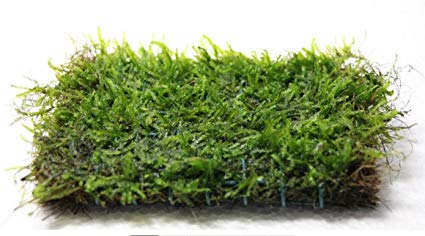
This plant is like a weed in the grass. Once it is in your tank, they grow faster than your girl scout cookies disappear. Especially under good lighting and water, they grow so fast that frequent trimming is required.
Now, they may grow slower in an axolotl tank considering the low light conditions. But they still generally grow well to a point that you will need to trim parts of them.
To grow them simply tie them down beneath your substrate, anchor them to your rocks or driftwood with black cotton thread and they will start to grow like weeds.
Get live java moss pad from Amazon here.
Java Fern
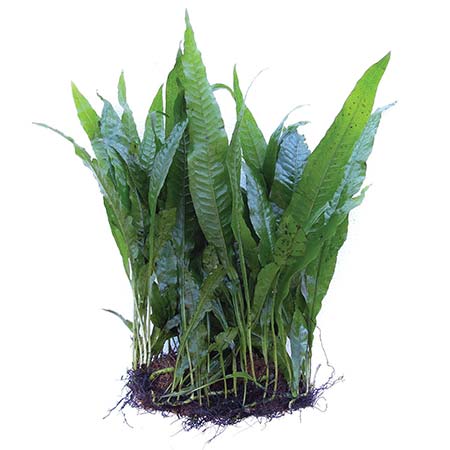
Java fern is one of the toughest plants on the planet! They are axolotl friendly mainly because they can grow anywhere even under lower lighting conditions. Once planted, really not much maintenance is required.
Similar to java moss, these ferns can be anchored on rocks, driftwood or be planted into a substrate and their roots will grow.
To get java ferns, check out these sellers at Amazon.
Anubias
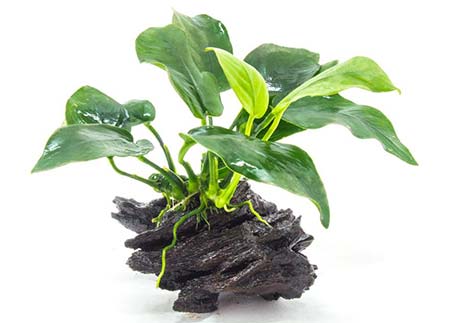
The next tough plant in line is Anubias. Anubias family are plants that are so hardy they can withstand any conditions. Axolotls are also known to take nips at these plants.
There is a huge controversy on whether it is safe for axolotls to ingest plants. But I what I can ascertain is that I have 2 axolotls in a tank full of Anubias for years. They are totally fine. That should be good enough proof that Anubias are perfectly safe for axolotls.
To plant them tie them down to wood, rocks, branches with black cotton thread and they will start to grow their roots around the surface.
Get ready Anubias plant stalk here at affordable price.
Hornwort
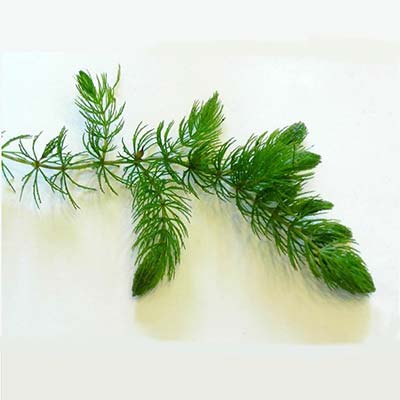
I generally find hornwort to be like an ammonia and nitrates sponge. Try using them and you will understand what I mean. Hornwort is great biological filters that thrive in low to medium light environments making them perfect for axolotls.
The downside to hornwort is that they generally have to be left to float on the surface, planting them will kill them causing them to rot.
Get life Hornwort plant that can be planted directly in your aquarium here.
Rocks
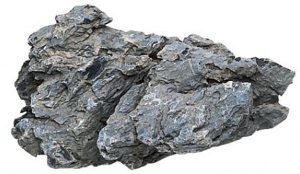
Rocks are generally not compulsory in an axolotl tank. In my opinion, they are mostly just for aesthetic purpose only. Though some may argue that rocks do provide some hardness to the water. But natural rocks often carry other contaminants that can ruin your water chemistry and PH. So if you do not know what you are doing. Don’t use rocks.
But if you gonna insist on using natural rocks for decoration or hiding spots then make sure you test them thoroughly for carbonate minerals.
Here is how to get them tested:
Method 1: Knife method (Faster way to test)
Step 1: Pick up a few rocks you prefer.
Step 2: Using a steel knife with the hardness of 7, scratch it across the rocks you picked.
Step 3: See if you leave any markings. If the rock cannot be scratched, you that rock is harder and is safe for your aquarium. If your knife leaves a scratch mark, the rock is softer than the knife and you will need further testing using muriatic acid in the next method to determine if it is safe.
Method 2: Using Muriatic acid (Safest method – continue from knife method)
Step 1: Prepare small amounts of muriatic acids. They can be found commonly in etching solutions for cement floors.
Step 2: Pick the rocks you wanted to test from other outdoors or use the rock from method 1 and pour some of these acids over them.
Step 3: Rocks that aren’t safe for your tank will produce a fizzing reaction and little bubbles forming on top.
Step 4: Rinse off the acid on “safe” rocks that have no reaction and take a closer look to see if there are any tiny shiny particles within. These shiny particles are the presence of metal that can disrupt your water chemistry. So remove them too.
Sanitizing your rocks:
Step 1: Scrub off the rock thoroughly
Step 2: Place rock into a pot and start boiling it for a few hours. You will need to be monitoring the rocks for any oil produced as it can cause explosions. If you see oily surface forming that these rocks cannot be used in your aquarium.
Step 3: Rinse it after under tap water
Step 4: Submerge it in another pot with cold tap water and detoxify it with prime. Keep it submerged for 24 hours at least.
After seeing all these steps, if you find it a hassle to clean and test them, you can also get PH neutral rocks from Amazon here.
So, are you still planning on using rocks? Instead of rocks alternatives like wood will also look great for your aquascape.
Wood
There are only 2 types of wood recommended for axolotl tanks. You can use either driftwood or mopani wood
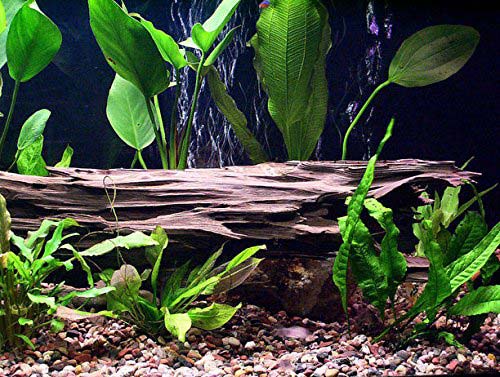
Pros of using wood:
- They look stunning. Make your aquascape complete.
- Provides a more natural habitat that looks stunning
- Used as anchors for your pants
- Create shade to act as hiding areas for axolotl
Cons of using wood:
- Tannins are produced when you submerge them into your aquarium. Tannins do not hurt your axolotls in any way. But it will turn your water color yellowish and sometimes murky.
- To avoid your tank turning yellow, we will go through a process to cure your wood.
Here are 2 methods that are commonly used for curing aquarium wood.
Method 1: Soaking method
Step 1: Submerge your wood fully into a pot of water
Step 2: You will notice your water turning color. Change your water once it becomes yellowish.
Step 3: Keep it soaked for a week or more. Change your water in between this period when necessary
Method 2: Boiling method (Fastest way)
Step 1: Fill water into your pot with wood inside
Step 2: Place your water over heat and wait for the water to boil
Step 3: Change the water every time it turns very yellowish or brown
Step 4: Boil it for at least 6 to 9 hours or more depending on the size
To get driftwood, you can pick them up along riverbanks or beaches and lakes. Alternatively, you can also get natural driftwood from Amazon.
Note that both wood that is picked up from outside or from stores should always be cured to protect against decay before submerging them into your aquarium.
Now that you have seen the preparation required for wood and rocks, what do you think?
We can also use other decorations as hideouts for an axolotl. Let’s take a look at what they are.
Decoration and hideouts
Certain props or structures can be used in your tank as decoration or anchors for plants to grow on. But the main reasons for using them are to act as hideouts for your axolotls. Hideouts keep the light out, allow them to feel safe and in the process lowering their stress levels.
Choosing a hideout
When it comes to choosing a hideout watch out the following:
- Make sure hideout doesn’t have any sharp edges that may cut your axolotl
- Make sure it is big enough for your axolotl to swim in and out.
Here are some great example hideouts from some of our fellow axolotl owners:
PVC pipe

Mini rock cave
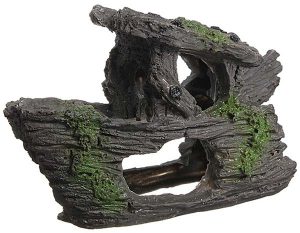
Shop for aquarium cave hideout here.
Terracotta Pots
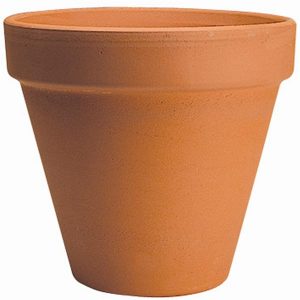
Shop for terracotta pot hideouts here.
Plants, wood, rocks, and hideouts are all essential parts of building a cozy home for your axolotls. In the next section, we cover the substrate which is another important factor for the well being of your axolotls.
Substrate
Substrate is the surface that is used at the bottom of the aquarium. For the housing of most aquatic creatures, substrate such as gravel or pebbles are commonly used. But all of these have to be avoided for axolotls at all times.
Why is that so?
Because axolotls eat by sucking the food that is in front of their face. Pebbles or gravels are usually smaller than it’s head, so it often gets sucked into its mouth along with its food – resulting in potential choking, indigestions, or even lead to impaction and death.
The solution?
Use either of the 2 substrates instead:
- Bare bottom – No substrate
- Fine sand substrate
Bare bottom tank – No substrate
Many owners prefer bare bottom tanks to have an easier time cleaning up. Whether is it for routine cleaning or cleaning up after feeding, bare bottom tank only requires a vacuum to suck up all the leftovers.
So let us see the pros and cons of a bare bottom tank
Pros:
- Easy time cleaning
- Will never cause impaction
- Feeding pellets or bloodworms may get really messy. For a bare bottom tank, you will have no problems picking up leftover food.
Cons:
- No grip for axolotls to walk on – May create stress for axolotls
- Can’t do planting or hold decorative hideouts in place. – decoration might get moved around much
Do you think bare bottom tank is ideal?
Let’s look at sand substrate before making a decision.
Sand substrate tank
Sand are great alternatives to gravel or pebbles. They are fine hence even when it goes into an axolotl’s mouth, it gets passed out easily.
The best part?
Sand is fine so they don’t trap any leftovers, unlike pebbles, gravel or stones where food or waste often gets stuck in between them. Sand is also said to help axolotl move around easier at the bottom hence it alleviates stress.
This point, however, is often argued as we will never really know how they feel about sand. One thing is for sure. Sand definitely imitate a natural habitat for your axolotls.
Pros
- Aesthetically more beautiful. Sand reflects light making aquascape looks alive
- Better surface to cultivate beneficial bacteria
- Creates a more natural habitat for axolotl
- Provides better grip for axolotl to walk on – This helps with stress
- Sand holds hideouts like mini caves, PVC pipings, and plants in place.
- Less leftover or food stuck in sand compared to gravel and pebbles
- Very fine and does not result in impactions.
Cons
- Definitely harder to clean compared to a bare bottom tank
- Pellets and food that are semi-dissolved might get mixed with sand. As they accumulate, your water chemistry can be screwed
So, what kind of sand should be used?
We want to use only fine sand that is less than 1mm in size. So here are some examples:
Play sand for children
Non-toxic children play sand with little to no clay content within is the awfully cheap and best type of sand for axolotls. They are very fine and doesn’t clump together in the water.
But if you are getting play sand make sure they don’t contain clay within or it will make your water murky resulting in cleaning troubles.
The downside to play sand is that they are silica based. Meaning that they will cause algae to build up in the water. High algae also can mean more cleaning and can also result in increase toxicity to your axolotl. But if you follow proper cycling and weekly change of water, this actually benefits your ecosystem.
Pool filter sand
Pool filter sand is another great alternative sand that is cheap and axolotl friendly. They are fine and are easy to manage. Some problems with pool filter sand include:
- Play sand is white in color which can be blinding to look at in a well-lit aquarium.
- They are also silica base so it may cause algae to build up which is bad if you don’t follow cycling procedures and water changing frequently.
But if these above are not a problem for you, go ahead with pool filter sand.
Take note that cheap play sand and pool filter sand from low-quality sellers may contain magnetite, a form of iron ore. Iron can cause health problems to amphibians like your axolotl.
Detect them by using a magnet to run through the sand and make sure nothing gets attached to the magnet. Otherwise, it means iron content is present within the sand. So only buy from places you trust.
Here are some pool filter and play sand from Amazon that are axolotl friendly
Lastly, we have sand that is made especially for aquariums. They are:
Specialty aquarium sand
They are non-toxic and some does not cause algae to build up. Specialty sand comes in many different variations and most of them are affordable as well. So depending on your preference you can go for the following types that are axolotl friendly:
Point to note: regardless of which sand you use, always rinse them through water several times to wash them through any other impurities.
Axolotl diet and feeding frequency
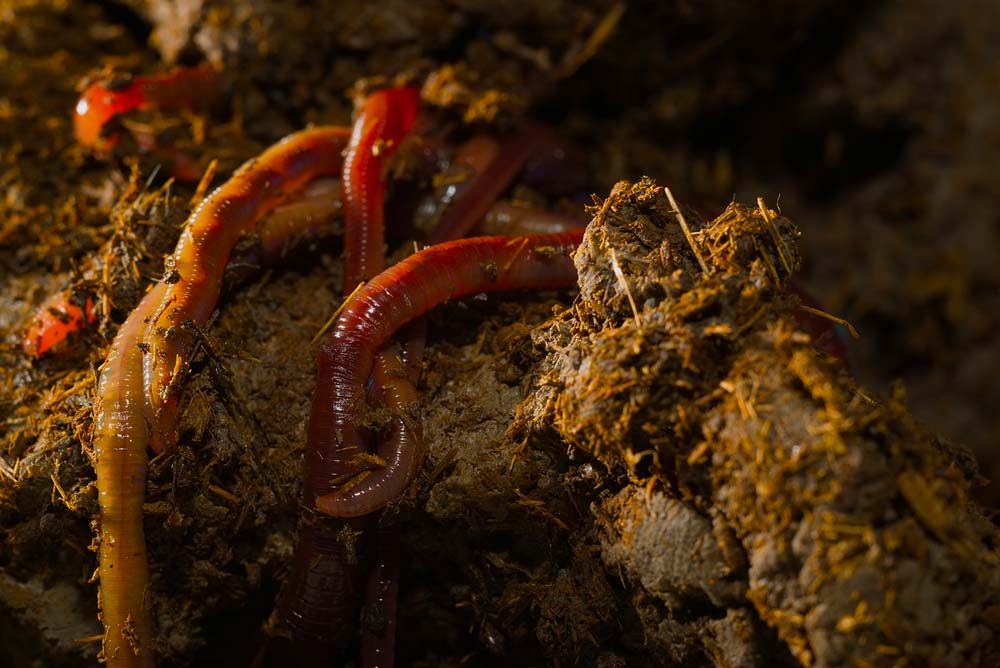
Axolotl are carnivores that eats any living, moving organism that is smaller than their mouth. In the wild they go for live insects, worms and smaller fishes.
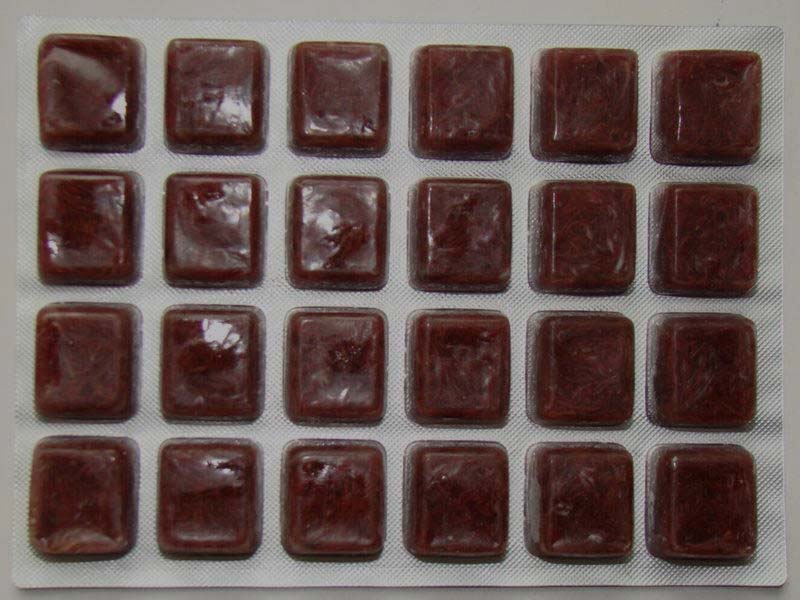
Domesticated ones on the hand can be fed with frozen food. But live food will still provide both juvenile and adult axolotls the right nutrients to grow. Here are some examples of food that are perfectly safe for your axolotls:
For live food
For frozen food
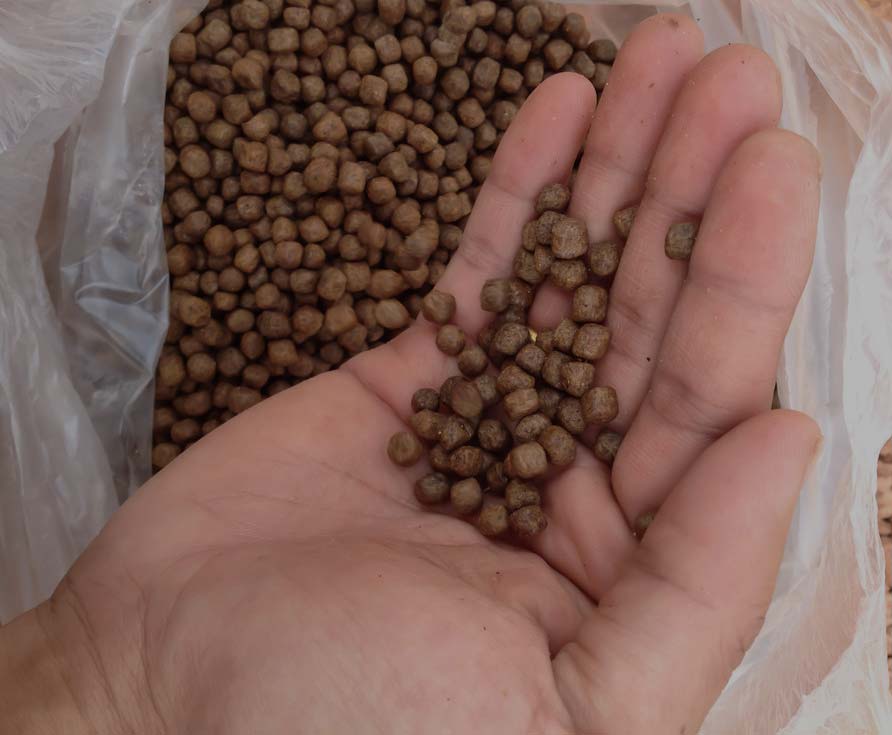
Pellets
Among all foods, live food contains the most nutrients but they can be a hassle to prepare or cultivate your own.
So check out our Axolotl gourmet guide if you are interested to learn some tips on how to prepare and feed them.
Feeding frequency
There is really no hard and fast rule for feeding as it depends on their size as well. Here are some quick tips:
- The general rule of thumb is to feed them adequately and look at their stomach.
- As it gets inflated, record down the amount of food you have fed them with.
- When they are full they tend to stop eating or may spit out food. When that happens don’t panic. It is normal.
- Make sure stomach does not get bigger than their heads.
- If it takes 1 full earthworm to get there then you know you can feed them 1 earthworm probably once or twice every 2 days. (Remember to cut your earthworms into smaller pieces)
To find out more in depth details about feeding and their frequency check out our Axolotl Gourmet Guide feeding frequency section.
Axolotl tank mates
If you have seen my other guide on tank mates, you will know that I strongly recommend not sharing any tank for my axolotls.
I just can’t emphasize enough how deadly it can become even among axolotls themselves.
So NO sharing of the tank with other freshwater creatures Period!
Why is this so important?
Just look at some of the consequences and you will know why:
After looking at these images, are you still planning on sharing tank?
Even sharing tanking between 2 or more axolotls can cause bites. This is especially frequent when they are younger since its their natural instinct.
As they grow into adulthood biting will become less frequent.
Find out more information about tank sharing, with our Axolotls tank buddies guide here.
Otherwise, let’s go into the topic of breeding.
Axolotl breeding
Axolotl breeding can be fun and interesting. To keep this endangered species going, it is good to try mating 2 axolotls to create an abundant line of baby axolotls.
In this chapter, I will run you through everything you need to know to ensure success in mating and breeding your axolotls.
Here is an overview:
- How to tell the gender of your axolotl?
- What is the right age for mating?
- Breeding season
- Breeding methods
How to tell the difference in axolotl’s gender?
Method 1
The simplest way to tell between a female and male axolotl is by looking at the size or shape of their bodies. The female has a rounder and plumper body whereas the male has a longer body and tail than the female.
Method 2
By far the most reliable method to tell the difference between a male and female axolotl is by looking at their cloaca. It is the portion under its tail where he poops. Male cloaca will be enlarged like a bump in the whole area of this cloaca.
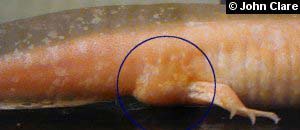
The female, on the other hand, may have a small bump too but it is never swelling in the entire area.
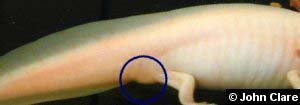
Images from: Axolotl.org
This method can only be used for axolotl who is about 9 months to a year old at least. Any younger axolotls will not have any swelling at their cloaca area so take note of that.
What is the right age and time for mating?
Axolotl can get sexually matured at about 5 months old to as old as 2 or 3 years. It is very dependent on their upkeep and the temperature of the water.
You should not start mating them when they are too young. You want them to at least be 18 months of age.
Why?
Because it can be tremendously stressful for their bodies to give birth when they are still young.
This can take a toll on their bodies hence affecting their lifespan and potentially shorten it.
Especially for the female axolotls, you want them to reach their maximum size before starting to breed. Their maximum size is generally greater than 30 cm or 12 inches.
So be patient, let them fully mature first before setting them up for breeding. While they grow, it is best to keep them separated until they are of the right age. Then put them into the same tank when you think they are ready.
Breeding seasons
There are many different opinions on breeding seasons. Most guides will tell you it is between December to June. For others, either in the middle of February or June to September.
So which do I follow?
Well, the truth is axolotls can breed anytime. Studies by Rufus R. Humphrey of Indiana University Axolotl Colony found that increasing light periods can facilitate mating behavior.
By shortening light periods followed by increasing their duration seem to help axolotls simulate a season change hence triggering courtship.
Another way to do it is by creating a sudden change in temperature.
From the author of the book “axolotls”, Peter W. Scott mentioned that you can actually facilitate mating by pairing your axolotls at temperatures between 20 to 22 °C or 68 to 71 °F, followed by transferring them into another tank that is 5 °C lower or a temperature of between 12 – 14 °C (54 – 57 °F).
This method uses temperature shock to trigger courtship behavior is said to have a high success rate.
The mating process
The male will swim around the tank laying their spermatophores. These Spermatophores are actually packets of sperm that will be laid all over the bottom of the tank.
Note that spermatophores will not stick to the bare glass of your aquarium so it is good if you have some form of substrate.
What happens after is interesting…
The male will initiate the mating ritual by “dancing” around to attract the female. If the female is attracted she will follow him as he leads her around the tank. The male will nudge the female’s vent as he will be lead the female to the spermatophore laid by the male previously. She will then pick up the sperm cap into her cloaca.
Fertilisation will begin and will start laying eggs within a few hours to a few days time.
She will lay eggs in the leaves of plants, around rocks or other decorative items in the tank. So it is important to have plants, hideouts areas for them to lay their eggs.
During this mating session, about a hundred to over a thousand eggs will be laid.
After laying eggs, it is best to remove the female from the male after laying eggs to let them recuperate.
Egg hatching process
Eggs usually take 2 to 3 weeks to hatch. It is said that eggs attached to plants are better for developing because of the circulation of water around the egg.
If eggs are in well-aerated water, most of them should hatch. Using an air pump or airstone will certainly be helpful but make sure it doesn’t cause strong water currents.
Lastly, the temperature of the water should be at 20°C or 68°F to be optimal for eggs to hatch.
You can find out more details about eggs and breeding in our comprehensive breeding guide here.
Conclusion
Didn’t expect it to be so difficult isn’t it?
Yes, taking care of pets is never easy. Especially for an exotic endangered one like Mexican walking fish.
These 9 points are the most essential when it comes to the survivability of your pet. But what you see here is only the tip of an iceberg. There are many more intricate steps to take to create a complete ecosystem and housing for your axolotl to ensure it lives to the fullest.
If you need more help, run through our other in-depth axolotl guides here where we touch on different topics from axolotl illnesses to their diet.
If not, let us know in the comments below what are other survival tips your have for your axolotl. If we miss anything let us know and we will add them in!


